Monday, June 10, 2019

Airstream: The Gift That Keeps On Giving

I have a friend named Vern. Vern has spent his 10,000 hours in the wilderness camping, hunting and trekking all over the world. He qualifies as an expert outdoorsman. On a trip with him last fall, he said that wilderness camping is one big giant problem solving expedition. That was my experience with him on a laaaaaarge lake in northern BC.

Well, I've discovered a new correlation: renovating an Airstream is just like wilderness camping. It's one gigantic problem solving expedition. Gotta weld up the frame, gotta grind off rust, gotta find the best rust-proofing solution, gotta find new axles, gotta find....well, when you're rebuilding a '74 travel trailer, you pretty much have to find everything. Thank the good Lord above for all the Facebook groups, chat rooms and people who have gone before me who point out places to get said supplies. And when the retro suppliers don't have it, then creativity must be exercised.

Take the inner wheel wells, for example. They're 44 years old (everything on the trailer was 44 years old except the fridge).  They cost $200 USD (for two) but shipping to Sumas, WA (a five hour drive one way) costs another $200 USD. This isn't including gas (unfortunately paid with CAD). So I thought and I thought 'till my puzzler was sore. Maybe Christmas itself doesn't come from a store... Sorry, wrong story.
Aluminum patches held in with Clicos prior to riveting.

I took some scrap pieces of belly pan aluminum and began remanufacturing the correct angles, fixing rips and holes. It's not necessarily pretty but (A) neither you nor I will ever see them unless (B) I have to fix them in another 44 years. I'll be 102. Hopefully six feet under long before that.

In addition, the four level-jacks all got a facelift. I removed all the rust and gunk, old bolts and replaced with new bolts, lock nuts and washers. I'd hate to get to a campground some day and find one or more jack having disappeared somewhere down the road.


Now comes the biggest puzzler so far. Almost as puzzling as trying to get off said northern BC lake while sitting in a trapper's cabin for sixty hours, enduring a massive wind storm. Sorry! Digression!

Before I could start working on the frame rust, I needed to flip the frame. Smart-neighbor-Pat suggested painting the bottom first, that way the belly pan material could be affixed. When the axles arrive, we'll flip it back over. There is relatively little to paint on the top side since I was able to access most of the frame as is. So, to flip the frame, I had to build two gantries. Did I tell you about this already? (Sorry, brain injury). I also purchased a chain hoist. Pat came over when I was finished building the gantries. He put is Smart-neighbor-Pat-pants on and together, we flipped the framed without incident (or loud expletives).  

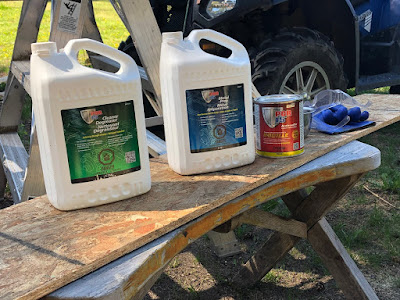
After all the rust was removed from the frame, I purchased a rust-prevention system from POR15. Initially, I went to a local business enquiring about their rust paint (and mentioned I had looked into POR15). The salesperson said to not even bother with theirs. He knew of the efficacy of POR15 and said that was the ticket. It is the ticket. After using POR15's degreaser/cleaner I applied the metal preparation liquid. It eats rust and prepares the metal. Sure, not all rust was eaten, but a large majority disappeared. Then came the paint. Very sticky stuff. Don't get it on your hands—you may have silver fingers for the remainder of your days. The paint dried to a hard coating and the rust has been safely put to bed. I might even make the claim the frame is entombed as well as Tutankhamen. 


And finally, we have new aluminum on the belly pan. Since I'm not going for best-in-show, I've decided to use some of the old aluminum. Not much actually, once the corrosion is cut away, but it was enough to save me the cost of at least an 8 x 12 sheet. And that's money in the bank. And my wife likes that.

So, since the axles are the next big push and they're still somewhere en-route in the USA, I guess I'll return to gathering wood for the winter. And researching plumbing systems (hot water tank, water pump, back flow valves, etc), propane system (model of stove, furnace), electrical (converter, inverter, lights, switches, wire, batteries [AGM, lithium, blah blah blah]). You get the the picture.

One giant problem-solving exercise. And for the life of me I can't figure out why I'm enjoying this.


Monday, May 20, 2019

The Welding Is Finished!

People in the Airstream world, especially new-comers (like me) often debate the merits of a complete shell-off renovation. And rightly so. It's a daunting prospect, removing the shell from the frame, etc. You quickly realize you're not even in the running for a pay grade, you're so out of your league. But hundreds have done it. One reason I decided to do it was because of the latter reason, and the wealth of info online.

I've come to the conclusion that unless the Airstream has been sitting in a heated garage for 30-40 years, not completing a shell-off renovation is like spinning the roulette wheel and hoping for a win.

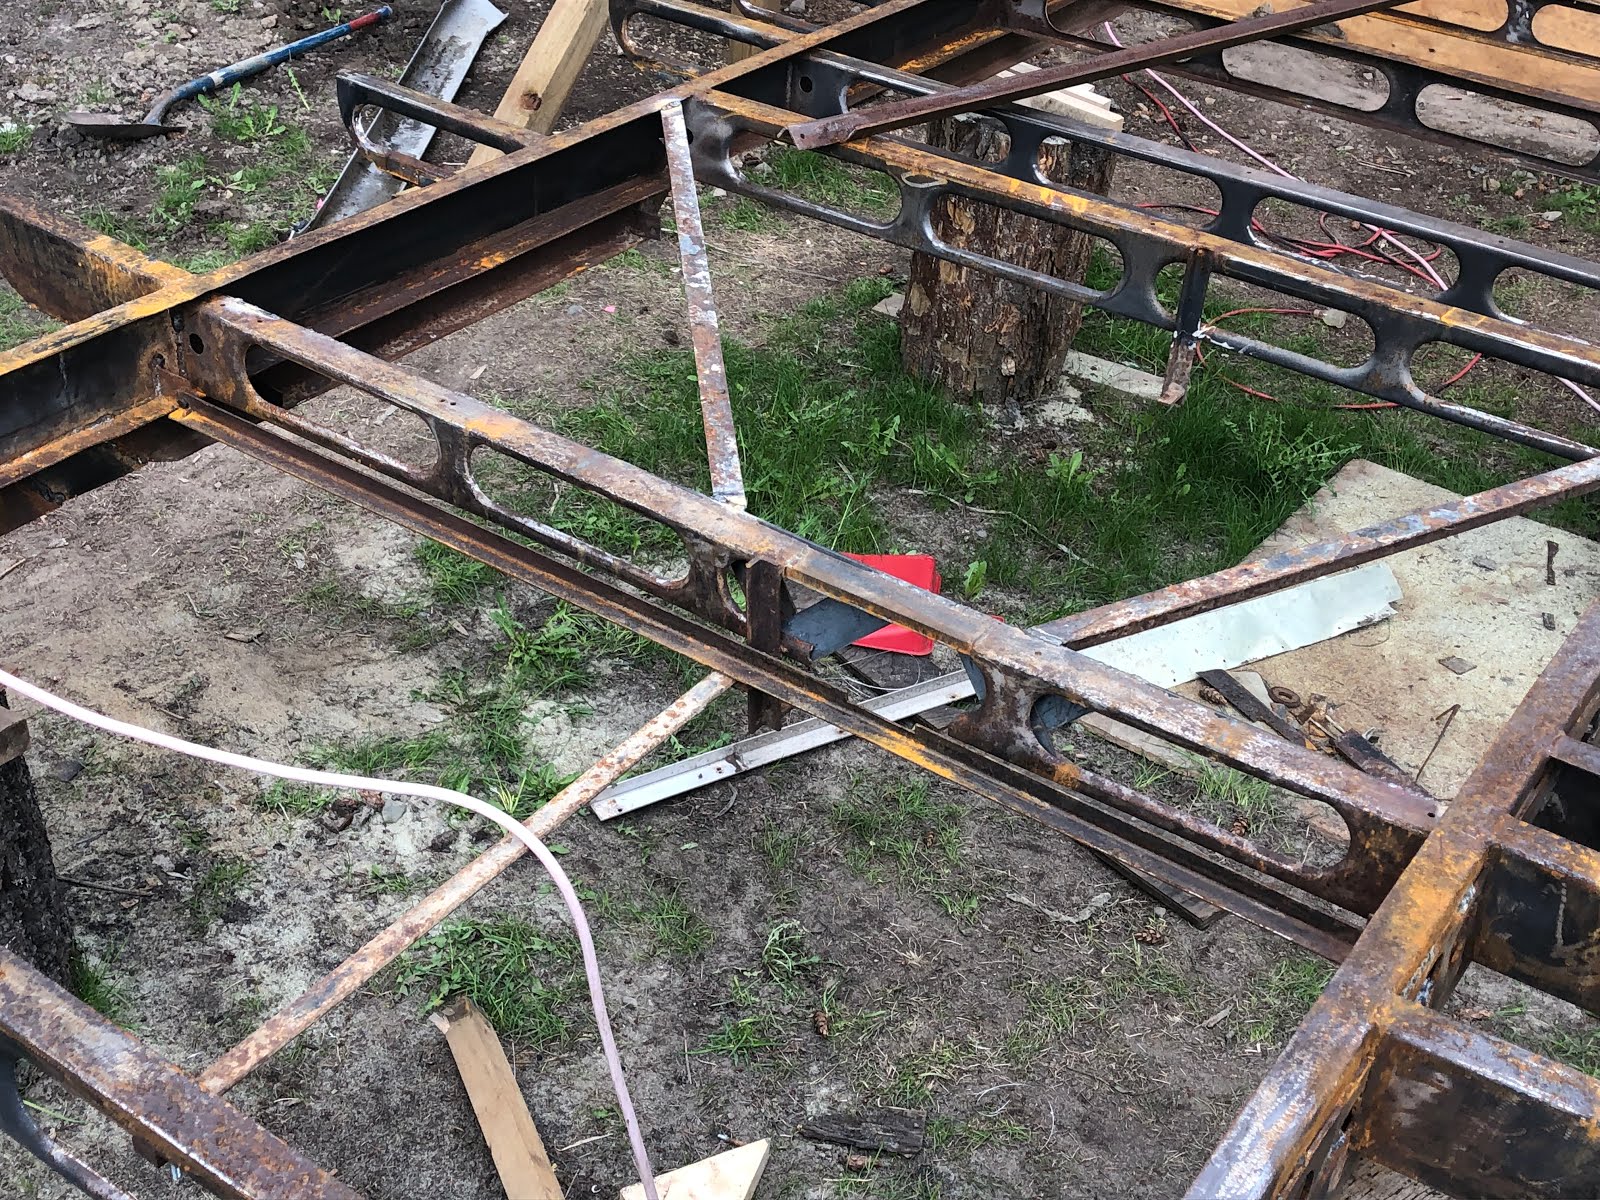
When I separated the trailer, it quickly became apparent that a previous owner had dragged the bumper and in the process, bent the frame ever so slightly. Result? Cracks in some cross-beams, a lots of rust where the greatest force had been exerted. There were a few spots where most of the metal had rusted away.

Smart-neighbor Pat taught me the basics of welding and as the ever optimistic guy he is, kept stating 'we can make this as strong as the day it came off the assembly line.' And we did!
Smart-neighbor Pat and me
The worst of the rust we cut out and then welded in new plate.

We also reinforced the grey tank area. Strangely, when Airstream designed these trailers, they cut one of the cross beams to facilitate the 1 1/2 inch grey waste pipe's entry into the black tank. It made said cross beam nearly useless. Seeing as we're not going to use a black tank (going with the composting toilet option) we strengthened the frame where AS originally weakened it.

Later this week I'm going to begin the POR15 rust prevention regime. The frame will be as good, if not better than new.

One H U G E step complete. 


Gray tank sits lower left; reinforced black tank area upper right


Tuesday, May 7, 2019

All Is Quiet On This Western Front

The calm before the storm perhaps.

Gantries are finished. Steel ordered. Waiting for its arrival and then it's time to start welding. Did I mention I've never welded before? Well, once upon a time I had never delivered a breech lamb and I did that successfully. How difficult can this be?

Perhaps my comparison is erroneous.

I've been grinding away rust on the Airstream frame. Today, I took the angle grinder and cut out rusted parts of the frame. Smart-neighbor-Pat says with the new steel welded in, the frame will be as strong as new. I ordered the Por15 rust regimen so any rust that is left on the frame will be DESTROYED by this stuff.

Axles are ordered from Inland RV in California. Should be here within the month.

I believe the saying is, "no turning back."

Whenever I feel overwhelmed, Smart-neighbor-Pat walks over to shoot the breeze, looks at what I'm doing and says, "No problem. This can be done." I knew a pigeon farmer who said the same thing, except his was, "No question," (probably a literal translation from one of the four languages he knows).

So with the down time on the trailer, I am finally finishing my dresser. I applied the first two coats of Watco Danish Oil (light walnut) and the wood looks fantastic. This will be a beautiful piece that will probably last a hundred years.


Sunday, April 21, 2019

It's gonna take more than three days...


....for this trailer's resurrection.

Since it's Easter Sunday it seamed a more apt comparison than something to do with rabbits. I digress.
     Well, the shell and the frame came apart with almost no hitch. As Max Smart once said, "Missed it by that much." I neglected to unhook the propane regulator from the trailer body. Thankfully pot metal snaps before aluminum rips. So once we heard a loud snaaaap the body and the trailer came apart.

I imagine this means I now have a disembodied trailer. Sounds like a lot of people I know. Oops—digressing again.
     Upon examining the frame I discovered that luckily, most of the rust is on the surface. There are a few outriggers than will need repair and a cross-member or two as well. One of the previous owners backed up too vigorously and dimpled the frame just behind the second axle. No worries. I'll grind out the weakened  material and weld in some new plate. Otherwise, the frame looks good. New axles should arrive in about 5 weeks. Week after next I'm going to sandblast the nooks and crannies of the frame and then prime and paint. Ah, but first, I'll be making a gantry. Just Google the word and you'll see what's in store. The prospect of sandblasting the underside of the frame whilst on my back does not fill me with joy, so the extra work required to build the gantry will be worth it. I should've built it first and lifted the shell off with it—would've simplified putting the two back together, but smart-neighbor-Pat says reattachment will not be a problem.
     Hmm....my unused music brain has just figured out that this project reflects the ABA sonata form: home—away—home (that is, trailer—separation—new trailer). One could also use a theological metaphor: attachment—detachment—reattachment.  Who knew renovating an Airstream could benefit one's ontological framework, their sitz im Leben, a renewed Weltanschauung. Or, get a sore back, pinched fingers, covered in steel dust and rust, have old insulation fall in their mouth....you get the idea.

Any regrets yet, you ask? None so far. While it's much easier to take things apart, the real test will be putting the whole thing back together. Mr. Gestallt will ring true: if I forget one of the parts, the whole will definitely be less than great.

Wednesday, April 3, 2019

Jonah in the belly of the whale

Well, that's what it feels like.

Of course, it's my own choice to be in this belly. Life would be much simpler if I could just accept a half-!@#ed job, button up the floor and walls and say, 'good enough.' Alas, a few life experiences no longer allow me to circumnavigate those waters. "Why do it right when you can do it cheaper?" is no maxim to follow when renovating an Airstream. You can't have better, faster, cheaper. You might be able to have two of the three, but all three spell disaster.

And this is why the shell is coming off. The prospect of trying to get the floor into the floor channel was impossible due to all the perimeter being rotten. I had to push, pry, cajole, sawzall, drill and rip it out. Some of it's fairly mangled, so I'll have to invent some ways of securing floor to ribs at those spots. "L" brackets come to mind. So, thanks to the folk at Drivin' & Vibin' (this couple has serious production values. Me? Not so interested. Here's their video: https://youtu.be/tshn3xP0mes). I watched their video a few times, talked to my nephew Karl (Wunderkind with all things practical—saved me from making some SERIOUS errors, potentially catastrophic [this is what happens when you work above your usual pay grade]) and decided if others have done, it can't be that difficult, right?

Mostly true. Building the skeleton to hold the shell was easy. Here are a few shots.

Start by laying out the stringers.
Create cross members
(not to be confused with folk at church business meetings)


Voila! The spiny skeleton that would make
a Pike proud.
The shell will be raised with five jacks, placed under the stringers. As soon as the shell is 5.5 inches up, 2x6s will be inserted back, middle and front, and then we'll continue to raise the shell until the wheels on the chassis can clear the shell (six sawhorses will carry the weight of the 2x6 beams). Then the real fun begins. First, I'll be grinding away at rust in order to prepare for painting. Then, my neighbor Pat is going to teach me how to weld some additional support to a few out riggers. I was fortunate: my trailer didn't live near the ocean or travel salty roads. The issues are mostly surface rust, with a few outriggers that look like a mouse has chewed on cheese. 

On another note, I made my first order with Vintage Trailer Supply, Vintage Trailer Gaskets, and Airparts. By the end of the week, I'll have what's needed to begin reattaching windows with new weather seals, and begin aluminum fabrication (got a buck rivet and pop rivet gun coming, two essential tools). The belly pan is in really good shape but I've got enough 5052H32 aluminum arriving so I'll be able to make entirely new sections.

I called Colin Hyde last week to get a quote for new axles. Things are starting to happen! I'm slowly moving from demolition/preparation to some rebuilding. 

Hope your week went as well as mine.


Saturday, March 16, 2019

The Wonderful World of Airstream Wing Windows


These windows are EXPENSIVE to replace. With shipping and exchange, probably a grand. So, to paraphrase Elmer Fudd, 'Be vewwy quiet, we're sepawating wing windows....'

First step in the process, take courage and watch others' ideas via uTube. I once learned how to deliver a breech lamb via uTube, so I figured someone else has gone before me and posted a video. And they had.

Second, drill rivets and remove window from trailer. 


Third, take windows to shop and remove four screws holding frame together. I thought they were going to be recalcitrant little buggers, but some WD40 did the job. 
Front of sash removed
Fourth, remove the front panel after screws are loosened. This was the easy part. Notice the shape of the gasket. Yes, I cut it but notice there's no butyl tape left on this window. This is why it was filling with water.  

The water in the window was frozen until yesterday.
Once the frame was removed (Goof Off is my new best friend. It makes old gasket material get slimy—literally melts it) from the gasket, I pulled the two panes apart.


Sash removed without too much trouble. Go slowly, make sure all force applied is vertical in orientation and use plastic chisels to slooooowly pry the glass apart.
That's 45 year old butyl tape. Still sticky but no longer waterproof.
Here are the two panes apart. 

Now, it's just a matter of scraping off old butyl tape. More Goof Off and elbow grease. After a cursory cleaning, we have a clean window, ready for new gasket material and reinstallation.


Wednesday, March 13, 2019

If ogres are like onions....

Yes, the saga continues. It's been quiet on the blog front as I've been woodworking for the past months. Can't work on the Silver Bullet when it's -25C. With the warmer weather (only -5 this morning) I've returned to the trailer. With a vengeance.

You see, it came with floor rot. The previous owner lied about nearly everything about the trailer (caveat emptor...). I knew there would be issues and I was prepared for the worst. Well, the worst has yet to transpire.  

I've pulled up all the floor. Been on my knees for two days. My very own pilgrimage of penance, but for what, I'm not sure. Maybe for starting this madness? 

Frame exposed. "Did you drain the water tank?" I asked. "Oh yes," he replied. The tank is FROZEN SOLID.
From my reading of others' blogs who have journeyed this road before me, a common problem is rusted frame. Usually the outriggers are the first to go. Thankfully, only one of mine will need replacing. There is a lot of surface corrosion on the frame, but that can be easily removed before priming and rust painting the frame.

The hardest part was removing the 3/4 inch plywood from the channel that surrounds the frame. I had to drill, chisel, sawsall, circular saw, prod and pray until it finally came out. Oh, and cut about 100 rusted bolts and screws.
And under the left garbage bag, a spare tire...
....that I accidentally cut through with the sawsall. First casualty of the trailer but I wouldn't have used the tire anyway. It's 45 years old. Some of the plywood, like the plywood underneath the rectangle (top right) is also frozen solid. "Any leaks?" I asked. "No, I don't think so," he said. I knew there were leaks—had to be—I just didn't know where. Turns out this is why the plywood is frozen solid in the channel. No worries. Once warmer weather hits, I'll chisel it out.

You'll notice the wheel well is removed (left side). Part of the renovation is how to seal all the water access points that developed over the 45 years. I'll be ordering aluminum sheeting, rivets, etc and fabricating patches and sealing spaces. Lots of Sikaflex 221 in my future.

The shoulder I injured in Austria skiing in 1979 (sounds exotic, right?  Alas, I hit a piece of grass and it threw me on my shoulder) is telling me that I'm not as young as I used to be. But the great thing is, I'll never have to repeat this part of the renovation.

Next step is to start removing rust. Once all the weather warms up, I'll pressure wash the entire frame and then start the painting process. Then come new water lines, electrical, windows, insulation, fans, furniture.... I should be done next week.

Stay tuned.