Thursday, June 4, 2020

The western myth of linear progress has me progressing along

Things are happening! It was a long cold winter. Building the cabinets helped pass the time but it wasn't until the warmer weather that things got chugging. Once the temperature reached 10C (50F) I was able to caulk all the seams as well as rivets. Yes, every rivet has been caulked on the inside of the trailer. Every seam, too. This baby ain't gonna leak, that is for sure. I'm sure I've used 10 or 15 tubes by now.
Partially completed
The 'camo' patch

Airstreams leak. Even though the mystery surrounding these trailers says otherwise, don't fall for it. Especially when they're 45 years old. The rear end of these trailers are particularly bad. I fixed the problem with a TON of caulking, added aluminum patches inside and out, and then did a little camouflage work with a cover patch. It worked out pretty well, I'd say.


A few other highlights! The badges are all on and the word "AIRSTREAM" is emblazoned fore and aft. The rock guard has been re-built and affixed over the front windows. The new AC arrived in record time and now sits on the roof. I had to make a few 'trusses' to keep the roof from sagging. Check them out! I thought it was an elegant solution.

Yesterday, I started applying insulation behind the front and rear end-caps. Ethan is here—and a good thing, too as he carried the AC up the ladder (70lbs—this lad has muscles) and helped press the rear-end cap into place.

Progress happens in tiny increments, day by day. I've been at this a year and a half and have started wondering what I'm going to do when the Airstream is completed. I'm sure my darling has been compiling a list, although I must say, I've kept up with the requests so far. I guess I can't spend all my time on the silver beast.

As far as the myth of linear progress, right now, I'm reveling in it. I have yet to make an error that demands I take stuff apart and start over. Jinxed? All appendages crossed, wood knocked and prayers to benevolent deities done.

You may have noticed there's no more silver paint on the aluminum. Another job completed!
Letters painted and clear coat applied.
I built the 'truss' out of aluminum stock and cut the wood on the bandsaw. It worked!
The trusses doing their job. 

Saturday, April 11, 2020

Renovation in a time of Plague

Hello folks,

Well, thankfully it's not Bubonic or Black, but it's still a plague.

April 10 has arrived, and the snow is finally melting. The temperature was actually above freezing this morning. I guess I'll call the hit-men and cancel the contracts for all the gophers in the vicinity.  During the loooooong winter, I kept busy completing tasks that weren't weather dependent. To that end, I started building the cabinets. It's a fairly simple process—I had only a few boo boos that were easily remedied. Basically, make a box and then a face-plate. Of course, it helps to have a workshop with precision tools, the Kreg pocket hole jig, and lots of clamps (thank you Jim F). So today, I finished the doors. I have two cabinets remaining to be built, but I'll delay building those until I begin assembling the interior, specifically the bathroom vanity and the broom/coat closet.

With the warmer weather, I grabbed a few tools and completed a few tasks on the Airstream. The bolts holding the awning to the body were badly corroded. A little WD 40 later, I ratcheted them out. Good thing, too. The threads had begun crumbling. They were little more than 'super glue'. I replaced them with stainless steel nuts and bolts. That awning ain't never coming off.

When I was younger (OK, like 17) and doing crap carpentry, invariably a boss would say, "We're not making kitchen cabinets." In others words, hurry it up! Get that cut done! Tote that barge! Lift that bale! Well, the day has come when, yes, I was making kitchen cabinets. I took my time. The cabinets turned out better than anticipated. I even milled the oak for a custom fit. I know, I know, I shouldn't doubt myself but like most of this project, I had never built cabinets before. Precision is the key. Precision is all that matters. My wood mentor (Tommi) once said that the day would come when being out .5mm or 1/64 would be unacceptable. That is a good mantra to follow when making cabinets. It was actually a nifty challenge to strive for absolute accuracy. Sure, I'm out a 1000th here or there, but who's counting, right?

I have my doubts that there'll be any camping this summer. I don't think the Airstream would have been ready except as an aluminum tent. The C-19 plague will have us locked down longer than anticipated, is what I think. How are you doing? An unusual time, I think you'll agree. I've been listening to CBC (while building said cabinets). People are finding isolation difficult. I understand that. I lived alone for two years (just me and the dog) and I learned that solitude and loneliness are not the same. Self-isolation during this time isn't difficult for me, since I had an unintended time of training for the present scenario we find ourselves in. There's a lot of anxiety and fear out there. I feel for the folk who are in apartments with small kids—mine are grown and on their own; jobs lost; rent and mortgage stress. When I'm tempted to get anxious, I think about the trajectory of my dad's life. He was born two years into World War One, in Russia, of all places. When he was one, the Revolution happened. What a way to start life, right? My dad's family emigrated to Canada in the mid 1920s—no easy task, I'll tell you, especially with a guy like Stalin in charge. They nearly didn't make it. Dad was a teenager during the Great Depression. He lived through World War Two. If he ever had any anxiety about anything, I never saw it. He didn't talk much about his past but his example lives on.

Take care, out there. We hope to see you on the road, someday.
More winter? Not so happy.

Gluing face of cabinet to the carcass
The basic idea (expect for the grain mix-up. Might be fixing that before installation...)

Airstream cabinet Tetris.

Crappy corroded ancient galvanized screws


Snappy brand new stainless steel bolts and nuts.

Enough caulking to deny even the most tenacious drop of water.


Friday, January 31, 2020

And We're Back At it!

With the onset of winter, the Airstream has taken the back seat. Mostly because of the cold. We had a spell of -40 F/C a few weeks ago. Prior to that the days were usually in the negative double digits but the Pineapple Express arrived this week and with warmer temperatures, I've returned to the Silver Bullet. It also helps that SNP lent me his ice-fishing propane heater. It's a three burner unit: I could probably work in my bathing suit, the contraption has that much heat.

For the past year, I've been wrapping my head around 12 volt wiring. At first, everything electrical seemed like tossing chicken bones and divination but after much study and letting the information ruminate in my head, I've had success.

Life With Wire.


First success: all the exterior 7-pin wiring works!


New rear lights.
I have to say, the new marker lights look grand. It's amazing how new plastic lights gave the trailer a million dollar face-lift. Upon the advice of an electrician friend, I wired each light with its own ground, bolted to the body. There is no way in Gehenna that I'll ever have a short.

Now that the exterior wiring is complete, it's time to start the interior. I had nightmares about this a few months ago, but finally came to realize that wiring happens one circuit at a time, meaning there's no need to get overwhelmed: complete said circuit and then move on to the next. Sure, one needs to calculate amp draw, AWG required, distance, voltage drop, etc...sounds like more chicken bones and divination, right? Nah. Actually, not that difficult. ORGANIZATION IS THE KEY. Something I learned in university, a looooooooong time ago.

Take a look at the fan: it works!

Once the wiring is complete, then the interior needs to be sealed with Sikaflex 221, but I'll need a stretch of warmer weather for it to properly cure. Then, a whole huge pile of things need to be completed before the insulation in installed. After insulation, interior skins! Then, paint and build the furniture.

A trip this summer? I'm not promising anything, but it might just happen. 

Saturday, October 26, 2019

It's Faaaaantastic!


Big day today. I removed the first vent and did a rough installment of the new Fantastic Fan. Process? First, drill out about 50 rivets that held the old vent in place. Truth be told, the old vent was a superior piece of work back in the day, but the motor was shot, it leaked, the lid was über-repaired. In short, 45 years later, it was a mess. Oh, and did I mention an absurd amount of ancient vulkem? The only way to remove the stuff is with a scraper and heat gun. And patience. The original gasket (or what was left of it—we'll let the archeologists argue that one) was paper with an adhesive.  Clearly, the makers of these trailers weren't expecting them to last as they have. Hence the later addition of butyl tape, more vulkem, more silicon (and please, if you ever work on an Airstream, resist the urge to use silicon. Even after decades, it simply doesn't want to come off).

The process of installation was simple. Use the foam gasket provided, mark the inner diameter of the hole, cut with shears, place fan in hole and use a few screws to keep it in place until spring thaw. I'm unable to do any caulking as temperatures are too low during the day. So, I'm working ahead.

Marlene figures this installation marks a turning point in the renovation process. Me? Not sure. I see this whole experience as a process: I have no end date, no deadlines, and no idea when it'll be completed. One thing I do know: if I were working full-time, working on the AS would potentially become tedious because it takes a LOOOOOOONG time. Putting in this fan took a couple of hours.

Two more to go.

By the way, don't always believe what you read on the internet (how's that for a revelation....). A fellow suggested, in one video I watched, to use butyl tape around the edges. Upon reading the installation instructions, the manufacturer specifically mentioned not using butyl tape. I think they're worried it might stress and later fracture the plastic flange (that is screwed onto the roof). The original AS vent was entirely aluminum—butyl tape would have been the perfect solution. No problem. I have many tubes of Sikaflex 221, just begging to be used. Come springtime.


Hole before cutting for new fan. Notice I'm standing on ribs.
Voila! New look inside. Sky light and fan.
Out with the old, in with the new.
And no, I'm not referring to dialectical antagonism.

Monday, October 7, 2019

And it's snowing!


Yup. Winter is a-comin' in, as expected and right on time. Or so we think. I'm very grateful to SNP for helping build the trailer garage. Without it, it would be another winter with no work done.

Moving the frame

As you may have noticed, the Airstream is back in one piece. It was an 8 hour job but not because of the difficulty. It was the finicky nature of putting the body back onto the frame. (If there is a next time, I'll build gantries for the shell as well as the frame. That would have simplified the reattachment process.) Without an accurate fit, buck riveting the two together might have been a problem. A few weeks ago, my nephew Dan came up for a visit with his wife and kids, and we buck riveted the body back to the frame. Nothing like working on a project to get two guys talking!

SNP and I dropping the body onto the frame
Wing window with new butyl tape

I've begun reinstalling windows. The stuff from vintageairstreamgaskets.com has worked very well. Without the internet, this kind of rebuild would be virtually impossible. The Vista View windows and stackers are all clean and clear. The new caulking is fantastic and holds everything in very well. But, I did run into a snag today. As I was reinstalling the curb-side wing window I came to realize that the bucking bar from vintageairstreamsupply.com didn't work. OH NO! There's a 18mm gap between the frame and the sash, and their bar is too large. Enter SNP. He looked at the bar and then after a moment said, "I can make you one in 15 minutes." Which he did. It fits the gap perfectly.

SNP's bucking bar.
So, the rebuild is coming along. Will I be done by next summer? Doubtful. Marlene and I may just head out with an aluminum tent. But the winter will be spent doing as much as possible, most likely and including installing the new Fantastic Fans, run the wiring, finish the plumbing, maybe even start insulating. There's no end of work to be done, but it's not a 'race to the bottom' (one of SNP's favorite sayings). It's about learning new skills and seeing progress in incremental steps.

At least, that's what I keep telling myself.

Saturday, August 17, 2019

Axles On & Hanger Built

Hello all,

Still plugging away. A few weeks ago I began the process of installing the new axles. This including cutting the frame as the new Dexter axles are a tad larger than the original. I sweated bullets but in hindsight for no reason. I am discovering that my woodworking skills are coming in handy with metal work, particularly when you need accuracy and cutting the frame required that. All-in-all, the axles went in without too much fuss.
A few tools to insure accuracy.
Fit just fine.
Voila! Two new axles ready to roll.
All the windows now have new seals. They're ready for installation. They look great! I put together the wing windows—they'll be the only ones with two panes of glass. In '74 the 'double pane' was just a piece of plastic in an aluminum frame. Didn't make much sense to re-install them, so I chucked the plastic and reused the frame (helps to finish off the interior look).
Wing window: Installing the gasket with dessicant
After desiccant, CLR goop that dries solid but remains flexible.
Both wing windows complete and ready to be placed into their respective aluminum sashes.
And the  pièce de résistance! I'm not sure what y'all store your Airstreams in for the winter, but up here in the interior of British Columbia, we go big. Behold "The Hanger!"
The Hanger—aka The Parthenon or Long House or Something Vikingish
About a month ago, SNP offered to help me put up a structure to house the Airstream. Well, here it is! My son Ethan helped put on the roof; Noel was the official cheer-leader. Marlene supplied libations when we were off the roof for the day. 

Next up for the AS is insulation, plywood floor and then SNP is going to help me put the frame and chassis back together. I believe there may be choice language and even a few expletive deleted before that job is through. Once the body/frame are reunited, interior work can begin.

Are we having fun yet?!


Wednesday, July 17, 2019

Further Musings

It's been quiet on the Airstream blogging front, but lots has been happening. It looks like Christmas came for the next few decades in both the shop and the house. You wouldn't believe the amount of small stuff you need to get if you're rebuilding a trailer from the bottom up. Last week we drove to Sumas WA to pick up the axles (and a whole bunch of other stuff from Pic-It-Up). Today, we picked up plywood for the floor, Rockwool insulation from the wall and belly pan, new copper pipe and valves from the gas lines, PEX for the water lines, etc. Looks like I'll be installing gas lines next after which I can flip the trailer over, fill the belly pan with insulation, reassemble the fresh water tank and gray tank, assemble the floor, reattach the trim that will connect the frame to the body, and a couple of hundred rivets later, the trailer should be two halves of the same whole.

Oops. Forgot. Have to assemble and attach the axels first. As the new Dexter axles have a larger circumference axle, I'll have to cut the frame to make room. No sweat, I say. You say, are you nuts? Cut the frame? Apparently so. Last I heard, it's tough to shove a metal axle into a slot designed for a smaller one.

This past weekend, Smart-Neighbor-Pat came by and helped me build a 'garage' for the Airstream. We tend to get a lot of snow in this part of the world, so a garage is necessary to (a) keep the snow, rain and evergreen needles off the roof and (b) allow me to work on it somewhat sheltered from the elements (once said snow arrives).

Smart-Neighbor-Pat (forever now referred to as SNP) instructed me to get materials ready and on Saturday the fun would begin. And what fun was had. This is what we built. We had numerous rain delays, which necessitated whisky and Cokes and lots of good conversation. It looks a tad like a StoneAge Parthenon, minus the roof. The roof will be put on my when my sons come for a visit in a few weeks (SURPRISE ETHAN AND NOEL!!). This was surprisingly economical to build and relatively simple to do (if you have a SMP handy). SMP is a wizard with a chain saw, so that was helpful. I pounded LOTS of Re-Bar to keep it together, as well as 10 inch log screws. Marlene and I figure this could also be a great party room (should the sun ever decide to shine in the Cariboo once more).


A few photos of other goings on with all things Airstream.
One tends to collect A LOT of different sized screws, bolts and rivets. Organization is key. So I built these two items to aid this brain-addled renovator keep organized.

The goal is to have the Airstream buttoned up and in one piece before the snow flies. I guess we'll all see if that goal is reached.
Inspired by the card catalogue at UBC. Remember card catalogues? Did my first degree with card catalogues. 
No inspiration here. Just had to get rivets organized.


Monday, June 10, 2019

Airstream: The Gift That Keeps On Giving

I have a friend named Vern. Vern has spent his 10,000 hours in the wilderness camping, hunting and trekking all over the world. He qualifies as an expert outdoorsman. On a trip with him last fall, he said that wilderness camping is one big giant problem solving expedition. That was my experience with him on a laaaaaarge lake in northern BC.

Well, I've discovered a new correlation: renovating an Airstream is just like wilderness camping. It's one gigantic problem solving expedition. Gotta weld up the frame, gotta grind off rust, gotta find the best rust-proofing solution, gotta find new axles, gotta find....well, when you're rebuilding a '74 travel trailer, you pretty much have to find everything. Thank the good Lord above for all the Facebook groups, chat rooms and people who have gone before me who point out places to get said supplies. And when the retro suppliers don't have it, then creativity must be exercised.

Take the inner wheel wells, for example. They're 44 years old (everything on the trailer was 44 years old except the fridge).  They cost $200 USD (for two) but shipping to Sumas, WA (a five hour drive one way) costs another $200 USD. This isn't including gas (unfortunately paid with CAD). So I thought and I thought 'till my puzzler was sore. Maybe Christmas itself doesn't come from a store... Sorry, wrong story.
Aluminum patches held in with Clicos prior to riveting.

I took some scrap pieces of belly pan aluminum and began remanufacturing the correct angles, fixing rips and holes. It's not necessarily pretty but (A) neither you nor I will ever see them unless (B) I have to fix them in another 44 years. I'll be 102. Hopefully six feet under long before that.

In addition, the four level-jacks all got a facelift. I removed all the rust and gunk, old bolts and replaced with new bolts, lock nuts and washers. I'd hate to get to a campground some day and find one or more jack having disappeared somewhere down the road.


Now comes the biggest puzzler so far. Almost as puzzling as trying to get off said northern BC lake while sitting in a trapper's cabin for sixty hours, enduring a massive wind storm. Sorry! Digression!

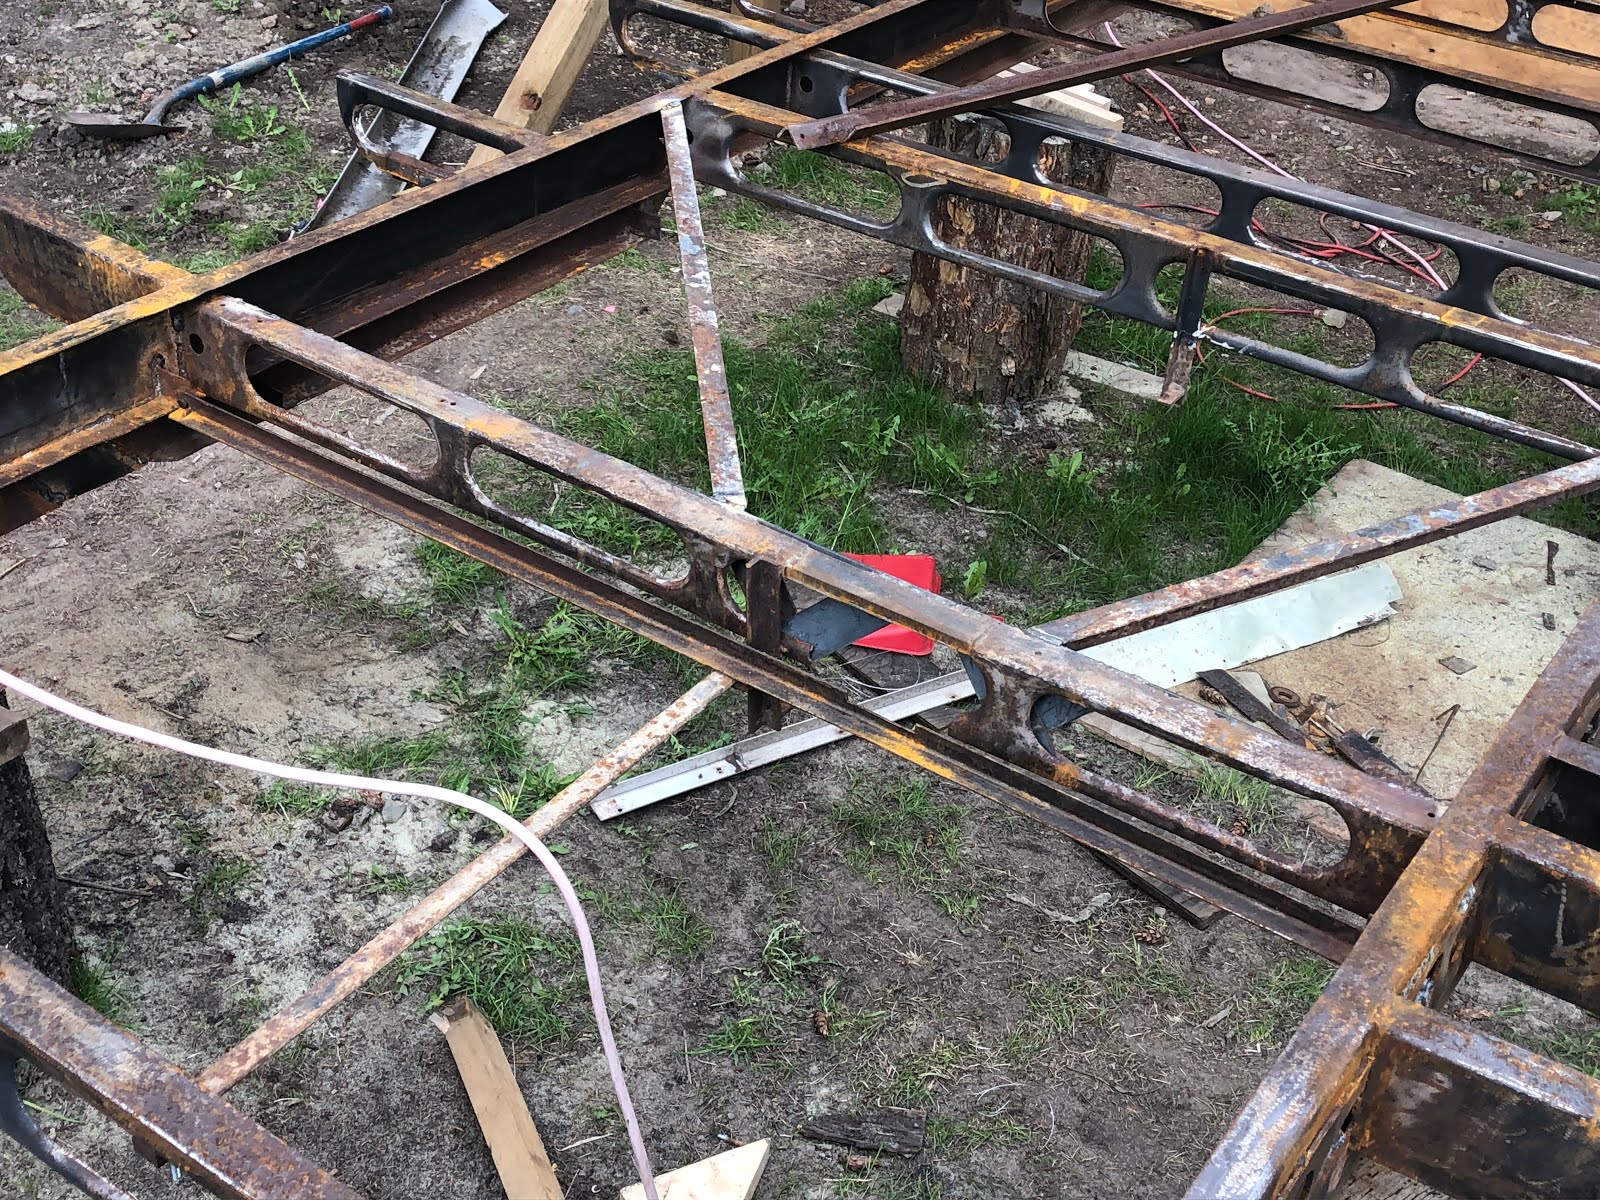
Before I could start working on the frame rust, I needed to flip the frame. Smart-neighbor-Pat suggested painting the bottom first, that way the belly pan material could be affixed. When the axles arrive, we'll flip it back over. There is relatively little to paint on the top side since I was able to access most of the frame as is. So, to flip the frame, I had to build two gantries. Did I tell you about this already? (Sorry, brain injury). I also purchased a chain hoist. Pat came over when I was finished building the gantries. He put is Smart-neighbor-Pat-pants on and together, we flipped the framed without incident (or loud expletives).  

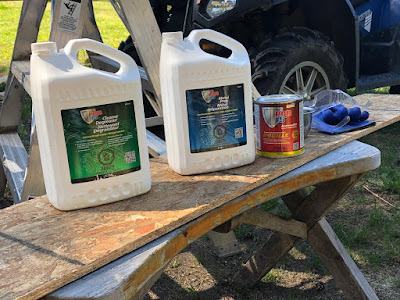
After all the rust was removed from the frame, I purchased a rust-prevention system from POR15. Initially, I went to a local business enquiring about their rust paint (and mentioned I had looked into POR15). The salesperson said to not even bother with theirs. He knew of the efficacy of POR15 and said that was the ticket. It is the ticket. After using POR15's degreaser/cleaner I applied the metal preparation liquid. It eats rust and prepares the metal. Sure, not all rust was eaten, but a large majority disappeared. Then came the paint. Very sticky stuff. Don't get it on your hands—you may have silver fingers for the remainder of your days. The paint dried to a hard coating and the rust has been safely put to bed. I might even make the claim the frame is entombed as well as Tutankhamen. 

And finally, we have new aluminum on the belly pan. Since I'm not going for best-in-show, I've decided to use some of the old aluminum. Not much actually, once the corrosion is cut away, but it was enough to save me the cost of at least an 8 x 12 sheet. And that's money in the bank. And my wife likes that.

So, since the axles are the next big push and they're still somewhere en-route in the USA, I guess I'll return to gathering wood for the winter. And researching plumbing systems (hot water tank, water pump, back flow valves, etc), propane system (model of stove, furnace), electrical (converter, inverter, lights, switches, wire, batteries [AGM, lithium, blah blah blah]). You get the the picture.

One giant problem-solving exercise. And for the life of me I can't figure out why I'm enjoying this.


Monday, May 20, 2019

The Welding Is Finished!

People in the Airstream world, especially new-comers (like me) often debate the merits of a complete shell-off renovation. And rightly so. It's a daunting prospect, removing the shell from the frame, etc. You quickly realize you're not even in the running for a pay grade, you're so out of your league. But hundreds have done it. One reason I decided to do it was because of the latter reason, and the wealth of info online.

I've come to the conclusion that unless the Airstream has been sitting in a heated garage for 30-40 years, not completing a shell-off renovation is like spinning the roulette wheel and hoping for a win.

When I separated the trailer, it quickly became apparent that a previous owner had dragged the bumper and in the process, bent the frame ever so slightly. Result? Cracks in some cross-beams, a lots of rust where the greatest force had been exerted. There were a few spots where most of the metal had rusted away.

Smart-neighbor Pat taught me the basics of welding and as the ever optimistic guy he is, kept stating 'we can make this as strong as the day it came off the assembly line.' And we did!
Smart-neighbor Pat and me
The worst of the rust we cut out and then welded in new plate.

We also reinforced the grey tank area. Strangely, when Airstream designed these trailers, they cut one of the cross beams to facilitate the 1 1/2 inch grey waste pipe's entry into the black tank. It made said cross beam nearly useless. Seeing as we're not going to use a black tank (going with the composting toilet option) we strengthened the frame where AS originally weakened it.

Later this week I'm going to begin the POR15 rust prevention regime. The frame will be as good, if not better than new.

One H U G E step complete. 


Gray tank sits lower left; reinforced black tank area upper right


Tuesday, May 7, 2019

All Is Quiet On This Western Front

The calm before the storm perhaps.

Gantries are finished. Steel ordered. Waiting for its arrival and then it's time to start welding. Did I mention I've never welded before? Well, once upon a time I had never delivered a breech lamb and I did that successfully. How difficult can this be?

Perhaps my comparison is erroneous.

I've been grinding away rust on the Airstream frame. Today, I took the angle grinder and cut out rusted parts of the frame. Smart-neighbor-Pat says with the new steel welded in, the frame will be as strong as new. I ordered the Por15 rust regimen so any rust that is left on the frame will be DESTROYED by this stuff.

Axles are ordered from Inland RV in California. Should be here within the month.

I believe the saying is, "no turning back."

Whenever I feel overwhelmed, Smart-neighbor-Pat walks over to shoot the breeze, looks at what I'm doing and says, "No problem. This can be done." I knew a pigeon farmer who said the same thing, except his was, "No question," (probably a literal translation from one of the four languages he knows).

So with the down time on the trailer, I am finally finishing my dresser. I applied the first two coats of Watco Danish Oil (light walnut) and the wood looks fantastic. This will be a beautiful piece that will probably last a hundred years.


Sunday, April 21, 2019

It's gonna take more than three days...


....for this trailer's resurrection.

Since it's Easter Sunday it seamed a more apt comparison than something to do with rabbits. I digress.
     Well, the shell and the frame came apart with almost no hitch. As Max Smart once said, "Missed it by that much." I neglected to unhook the propane regulator from the trailer body. Thankfully pot metal snaps before aluminum rips. So once we heard a loud snaaaap the body and the trailer came apart.

I imagine this means I now have a disembodied trailer. Sounds like a lot of people I know. Oops—digressing again.
     Upon examining the frame I discovered that luckily, most of the rust is on the surface. There are a few outriggers than will need repair and a cross-member or two as well. One of the previous owners backed up too vigorously and dimpled the frame just behind the second axle. No worries. I'll grind out the weakened  material and weld in some new plate. Otherwise, the frame looks good. New axles should arrive in about 5 weeks. Week after next I'm going to sandblast the nooks and crannies of the frame and then prime and paint. Ah, but first, I'll be making a gantry. Just Google the word and you'll see what's in store. The prospect of sandblasting the underside of the frame whilst on my back does not fill me with joy, so the extra work required to build the gantry will be worth it. I should've built it first and lifted the shell off with it—would've simplified putting the two back together, but smart-neighbor-Pat says reattachment will not be a problem.
     Hmm....my unused music brain has just figured out that this project reflects the ABA sonata form: home—away—home (that is, trailer—separation—new trailer). One could also use a theological metaphor: attachment—detachment—reattachment.  Who knew renovating an Airstream could benefit one's ontological framework, their sitz im Leben, a renewed Weltanschauung. Or, get a sore back, pinched fingers, covered in steel dust and rust, have old insulation fall in their mouth....you get the idea.

Any regrets yet, you ask? None so far. While it's much easier to take things apart, the real test will be putting the whole thing back together. Mr. Gestallt will ring true: if I forget one of the parts, the whole will definitely be less than great.

Wednesday, April 3, 2019

Jonah in the belly of the whale

Well, that's what it feels like.

Of course, it's my own choice to be in this belly. Life would be much simpler if I could just accept a half-!@#ed job, button up the floor and walls and say, 'good enough.' Alas, a few life experiences no longer allow me to circumnavigate those waters. "Why do it right when you can do it cheaper?" is no maxim to follow when renovating an Airstream. You can't have better, faster, cheaper. You might be able to have two of the three, but all three spell disaster.

And this is why the shell is coming off. The prospect of trying to get the floor into the floor channel was impossible due to all the perimeter being rotten. I had to push, pry, cajole, sawzall, drill and rip it out. Some of it's fairly mangled, so I'll have to invent some ways of securing floor to ribs at those spots. "L" brackets come to mind. So, thanks to the folk at Drivin' & Vibin' (this couple has serious production values. Me? Not so interested. Here's their video: https://youtu.be/tshn3xP0mes). I watched their video a few times, talked to my nephew Karl (Wunderkind with all things practical—saved me from making some SERIOUS errors, potentially catastrophic [this is what happens when you work above your usual pay grade]) and decided if others have done, it can't be that difficult, right?

Mostly true. Building the skeleton to hold the shell was easy. Here are a few shots.

Start by laying out the stringers.
Create cross members
(not to be confused with folk at church business meetings)


Voila! The spiny skeleton that would make
a Pike proud.
The shell will be raised with five jacks, placed under the stringers. As soon as the shell is 5.5 inches up, 2x6s will be inserted back, middle and front, and then we'll continue to raise the shell until the wheels on the chassis can clear the shell (six sawhorses will carry the weight of the 2x6 beams). Then the real fun begins. First, I'll be grinding away at rust in order to prepare for painting. Then, my neighbor Pat is going to teach me how to weld some additional support to a few out riggers. I was fortunate: my trailer didn't live near the ocean or travel salty roads. The issues are mostly surface rust, with a few outriggers that look like a mouse has chewed on cheese. 

On another note, I made my first order with Vintage Trailer Supply, Vintage Trailer Gaskets, and Airparts. By the end of the week, I'll have what's needed to begin reattaching windows with new weather seals, and begin aluminum fabrication (got a buck rivet and pop rivet gun coming, two essential tools). The belly pan is in really good shape but I've got enough 5052H32 aluminum arriving so I'll be able to make entirely new sections.

I called Colin Hyde last week to get a quote for new axles. Things are starting to happen! I'm slowly moving from demolition/preparation to some rebuilding. 

Hope your week went as well as mine.


Saturday, March 16, 2019

The Wonderful World of Airstream Wing Windows


These windows are EXPENSIVE to replace. With shipping and exchange, probably a grand. So, to paraphrase Elmer Fudd, 'Be vewwy quiet, we're sepawating wing windows....'

First step in the process, take courage and watch others' ideas via uTube. I once learned how to deliver a breech lamb via uTube, so I figured someone else has gone before me and posted a video. And they had.

Second, drill rivets and remove window from trailer. 


Third, take windows to shop and remove four screws holding frame together. I thought they were going to be recalcitrant little buggers, but some WD40 did the job. 
Front of sash removed
Fourth, remove the front panel after screws are loosened. This was the easy part. Notice the shape of the gasket. Yes, I cut it but notice there's no butyl tape left on this window. This is why it was filling with water.  

The water in the window was frozen until yesterday.
Once the frame was removed (Goof Off is my new best friend. It makes old gasket material get slimy—literally melts it) from the gasket, I pulled the two panes apart.


Sash removed without too much trouble. Go slowly, make sure all force applied is vertical in orientation and use plastic chisels to slooooowly pry the glass apart.
That's 45 year old butyl tape. Still sticky but no longer waterproof.
Here are the two panes apart. 

Now, it's just a matter of scraping off old butyl tape. More Goof Off and elbow grease. After a cursory cleaning, we have a clean window, ready for new gasket material and reinstallation.